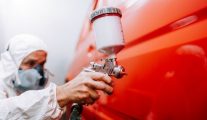
There is nothing worse than noticing a scratch on your car. Not only does it harm the overall aesthetic of your vehicle, but it can lead to more problems down the line. That is why you need to repair it as soon as possible. And as it turns out, touching up paint on a car can be extremely easy.
However, not following the proper paint touch-up steps can reveal visible strokes; that area of your vehicle will appear unlevel and mismatched with the rest of your car, potentially making the damage stand out even more. To prevent this, learn how you can easily and affordably touch-up car paint damage like a pro.
Assess the Damage
It is common for drivers to run into some trouble on the road. In fact, per Safer America, “With more than 143 million Americans commuting daily, there’s no doubt that car accidents are bound to happen.” Typically, these events lead to exterior damage on your vehicle—the most common being scratches that ruin the paint.
Before you start to touch-up the car paint damage, make sure you assess it first. Take a close look at the damage and assess how big or small of a project this will be. This is the first step to determining if you can do it yourself. If you conclude that you can solely perform the repair, you will also need to decide on what items you need to buy.
Determine if You Can Do It Yourself
Touching up paint damage is one of the most affordable DIY repair projects. You can purchase Scratch Wizard’s paint repair kit for as little as $34.99, while an auto body repair shop may charge you upwards of hundreds of dollars. Using a Scratch Wizard kit makes the fix incredibly easy as you can fill the scratch with paint in just a couple of minutes. However, this process applies mainly to smaller scrapes and scratches. If large portions of your car’s paint are damaged, it is in your best interest to have a professional perform the repairs.
Buy What You Need
To touch-up the car paint damage yourself, you will need to gather a few things. A Scratch Wizard touch-up kit will come with everything you need to patch up your vehicle. The kit includes:
- Scratch-filling putty
- Excess paint and putty remover
- Disposable towels
- Fine-tipped touch-up brush
- Gloves
- Directions
Match Up the Paint
Another important step to this process is matching up the paint color via the specific paint code for your car. There are a few ways you can do this. One way is to locate the sticker on the driver’s side door. Another way to find the paint code is to look for the VIN sticker on the driver’s side of your windshield.
When you buy a touch-up kit from Scratch Wizard, you will receive a form that will ask for the correct paint color. If you are having trouble finding your paint code, you can always put in a custom order. Getting the correct paint color will ensure that your car maintains a consistent look and make the scratches seamlessly disappear.
Wash Your Vehicle
Now that have your touch-up kit in order, you will want to wash your car. You can complete this step at home or at a local car wash. Ensure your car is clean before you begin the touch-up process—you want your vehicle to be in the best condition possible before you start to work on it. A car wash will remove any excess dirt that could potentially get in the way of your paint job.
Touch-Up Your Car
Many car owners perform minor car repairs in their driveway. If you plan on doing the same, make sure you are fixing your car’s paint during a week with nice weather. If it starts to rain, you could run the risk of ruining the touch-up process.
Administer Scratch Filling Putty
With your car clean, you can now begin the touch-up process. The first step to using a Scratch Wizard Touch-Up Paint Kit is to apply the scratch filling putty. You will want to put the scratch filling putty on the towel that comes with the kit and wipe it over the damaged area.
Remove Excess Putty
After you finish wiping the scratch filling putty over the damaged area, you will want to remove any extra material. You can do this by using the excess paint and putty remover. Simply apply the chemical on a disposable towel and wipe the area.
Apply Touch-Up Paint
Now that you have filled the scratch and it is level with the surface of the car, you can begin painting. You should already have the touch-up paint that matches your vehicle’s paint code, so you can immediately begin to apply it. The kit comes with a small brush which makes it easier to blend the spot with the rest of your car.
Let It Dry
After you touch-up the spot, regardless of how much paint you used, let the paint dry. Once the re-painted area is totally dry, you should see that the deep scratch in your car has successfully blended in—like magic, it should completely disappear.
Avoid Clear Coat
Most car touch-up repairs require you to use a clear coat after you finish applying the colored paint. However, Scratch Wizard kit’s include high gloss paint, which means it is not necessary for you to use a clear coat. This not only saves you money on small automotive paint repairs, but it also saves you time.
While some car owners may not consider a small scratch to be a big deal, there are many benefits that come with touching up cars. Patching up a small scratch can actually add value to your car for when you eventually want to sell it. Covering up any scratches will also prevent rust from spreading and causing more damage to your vehicle. For an affordable and easy car paint repair, grab a Scratch Wizard Touch-Up Paint Kit today.